If you’ve ever needed to start your PC from fresh or if you’ve freshly built your very first gaming PC build, then you would have had to install an Operating System, such as Windows 10 or 11 at some point.
There are many ways you can do so that make the process as simple as possible and gone are the days that you used to grab the install disk from the store.
These days, what you’ll do is in one way or another, is create a bootable USB (or bootable drive of some sort). Then once you’ve created your bootable disk, you stick it into your PC or new PC build, boot from it and then install it onto your new storage device, such as an SSD.
@newbcomputerbuild How to create a #free #windows10 or #windows11 #bootableusb the easy way. #pcbuild #techtok #pcsetup #windowsinstallation #computertips #techtips ♬ Windows XP Song (Meme) – MemerMeme
Here’s the Easiest way to Make Your Windows 10 or 11 Install USB
What I’m going to go through is what I believe to be the simplest and easiest way to create your Windows 10 or 11 bootable USB install. There are many ways, and one that may work for you is Microsoft’s own Windows Media Creation Tool. However, I find that the Windows Media Creation tool isn’t always the best fit, as it doesn’t allow for the selection of the partition format (ie. MBR versus GPT), which may be a problem for PC builders who may be using legacy hardware.
So what I’m going to suggest is using the open-source software, Rufus instead to create your free Windows 10 or 11 install USB. This is because it offers a little more flexibility in how you create your disk, and Rufus can also be used to create boot drives for other operating systems too.
Requirements:
- A Working PC in need of and capable of Windows 10 or 11 (Check out Microsoft Windows 10 Hardware Requirements or Microsoft Windows 11 Hardware Requirements)
- A USB Drive (or storage device) with 8GB minimum of space
- A working PC to create the bootable Windows 10 or 11 USB
Step 1: Download Rufus
The first step is to download the Rufus open-source software used to create your bootable Windows 10 or 11 USB: https://rufus.ie/en/
Step 2: Insert your USB, Install Rufus and Select the USB Under “Device”
Once you’ve successfully downloaded Rufus, install it and insert your USB if you haven’t already done so.

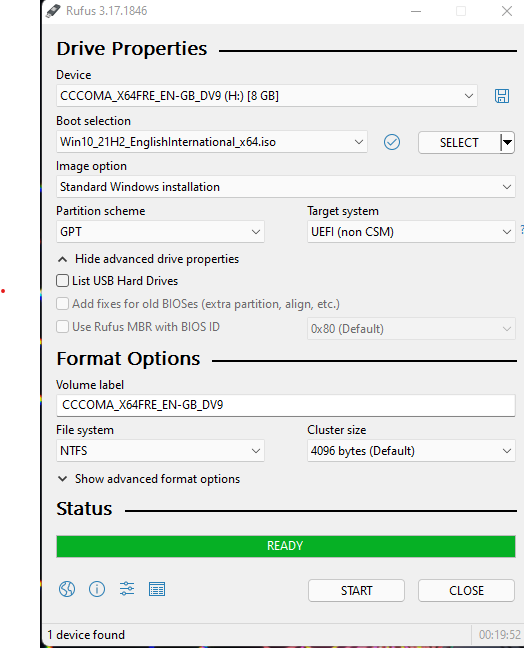
The first option you see when opening up Rufus is the drop-down for “Device”, here’s where you want to select your proper USB.
*Make sure to select the proper USB if you have multiple inserted as everything on it will be erased.
Step 3: Download Which Windows You Want
First, make sure the “Boot selection” has “Disk or ISO image” selected (it should be by default) and then to the right of that field select “DOWNLOAD” (if you already have a Windows install ISO on your PC you may also select it by using “SELECT” instead.
Once you click download, select Windows 10 or Windows 11 and click continue.
Then select which Windows Release you’d like (just used the most recent one if you’re not sure), and then select which Windows Edition (ie. Home/Pro/Edu) and then click Continue.
Now select Language and Continue again and then for Architecture select x64 if you have a 64-bit system (unless you have an older x86 or 32-bit system you’re creating this boot USB for).
You can now select “DOWNLOAD” and save the ISO image where you want on your PC.
Step 4: SELECT Windows ISO and Choose Partition Scheme
Once your Windows ISO downloads, you can now click “SELECT” and select the downloaded Windows ISO file.
The next step is to select the “Partition scheme”, and this is very important. Most likely you will be selecting “GPT“, however, if you are making your Windows install media for an older PC (such as 32 bit), you will need to select “MBR”. GPT is used for more modern UEFI systems (your PC’s pre-boot software). If you’re still unsure which to pick, check out this howtogeek.com article explaining the difference between GPT and MBR.
Step 5: Start Creating the Windows 10 or 11 Bootable USB
The last step to creating the actual bootable Windows 10 or 11 USB is to click “START” at the bottom and wait until the process finishes.
When everything is complete, eject your USB as per usual, and now it’s ready to be used to install Windows 10 or 11 on your PC Build.
Step 6: Install Windows 10 or 11
Now that you’ve made a free bootable Windows 10 or 11 USB, you should now be able to plug it into your PC and boot up to it. If you don’t know how to do this, please refer to your PC’s motherboard manual or boot to your BIOS or boot-device selection menu and select the USB as the boot disk.
Next, install Windows.
Conclusion: Creating your Free WIndows 10/11 Bootable USB
Creating your free Windows 10 or 11 boot disk is relatively straightforward. Going through the above process on how to do so is also free, and will allow you to install and boot into Windows as you normally would.
However, even though this process is free, it doesn’t mean that you’ve officially activated Windows, so if you don’t already have a Windows activation key, you will need to buy one.
You can though, continue to use your PC without the purchase of a key, there are just a few minor inconveniences for doing so. Such as you will not be able to personalize the desktop background, window title bar and Start color, change your theme, customize Start and some other personalization features.
I hope this was straightforward and that you’re easily able to create your Windows 10 or 11 startup USB easily using the above processes.
If you have any questions, please feel free to leave a comment or if you are looking to build your very own PC, then please check out our Best Gaming PC of the Month — where you can use this process to easily create your own Windows boot drive.

