
Planning My Kodi Box PC Build
This article is for anyone who is interested in the process I undertook to build a DIY test bench in order to build my own Kodi box using spare hardware from an old pc build. In order to run kodi, you certainly don’t need any super expensive hardware, especially if what you are mostly going to do is stream, which is what I planned on using this build for.
To start, I had an old PC Build that I had mushed together with spare hardware years ago for my mom, but finally the time came where it had to go in replacement for a new one, so I re-claimed all of the hardware for re-purposing. After some thought I decided that I didn’t need another generic pc laying around doing nothing, so I needed to find a use for it. I had seen a bunch of others buying these Kodi TV boxes or others building their own, so I thought this would be the perfect addition to my media room. I also didn’t necessarily want to spend any cash, so I had to think of exactly how I was going to do this.

The PC Build Hardware I Used For The Kodi Box:
Within the old build I had was an older AMD APU (with no graphics card), a compatible ASUS Motherboard, 8GB of DDR3 RAM, a 500W PSU, and I have a ton of HDD’s lying around so I chose a very small Seagate 120GB 7200RPM HDD as I was going to mainly use this system for streaming to start with as I have plenty of other drives with media on them at the moment (I would have much preferred an SSD, but didn’t have a spare).
- CPU: An AMD APU (2011)
- Motherboard: ASUS F1A75-M LE
- RAM: 8Gb DDR3 Gskill RAM (2x 4Gb Sticks)
- PSU: 500Watt Cooler Master PSU
- STORAGE: A Seagate 120Gb 7200 HD (I just chose one of the many spare old HD’s I had laying around – prefer an SSD)
- PC CASE: I built a Test Bench out of some wood and an old PC case (*learn more below)
- EXTRA: D-LINK Wireless PCI-E Card for WiFi
Minimum Hardware Requirements for Kodi
The actual hardware requirements are really low for any PC Kodi streaming build, which you can see in the table below. So if you are planning your own budget Kodi streaming pc build then you can use this table as a reference (from kodi.wiki Supported Hardware):
| CPU | x86 or x86-64 processor such as: Intel Pentium 4/ Pentium M, AMD Athlon 64 / Opteron, or newer CPU (that support SSE2, which all CPUs made within the last 10-years does).
|
||||||||||||||||
|---|---|---|---|---|---|---|---|---|---|---|---|---|---|---|---|---|---|
| RAM |
|
||||||||||||||||
| Graphics | Kodi will run on most graphics cards made within the last 10-years or so, though for good hardware video decoding support a little newer graphics cards can be required. This includes most cards from AMD/ATI, Intel, or NVIDIA which support OpenGL 2.0 or later.
|
||||||||||||||||
| Video decoding | For hardware video decoding, which may be necessary on low-performance CPUs to playback 1080p content, make sure your GPU or VPU supports either VAAPI, VDPAU, or OpenMAX. | ||||||||||||||||
| Drive space | The Kodi application generally only takes up between 100 to 200 MB of space, depending on how the binary is compiled. Technically speaking, if your hardware supports netbooting, you do not even require a internal storage for either the operating-system or for Kodi.
|
Building My DIY PC Test Bench
The old PC Build I had was using an even older PC case that was a typical large ATX case that had the loudest fans you’ve ever heard and simply would not fit into my media space where I wanted to keep this Kodi Streaming PC Build. So I had to either find another case or solution for putting all of this hardware together – and what I decided to do was cut up the old case and use some spare wood I had from some old ikea shelving to create my very own DIY PC test bench.
For those of you that don’t know, a PC test bench is generally a PC without a case that is generally used to test out hardware without the hassle of first fitting all of you hardware into a PC case. Now this solution may not be for everyone, but it seemed to fit the bill for my budget and what I had laying around in terms of parts and hardware.
Step 1 – Taking Out The Motherboard Tray From The Old PC Case To Use For The PC Test Bench Top
My goal was to make this build as tight as possible, at least reasonably so for an old ATX sized motherboard and hardware. So what I did was completely cut out the motherboard tray from the old case I had, which was a tad larger than the overall ATX motherboard size. Now the motherboard tray was the size I used as a reference for the overall build size in terms of it’s length and width.

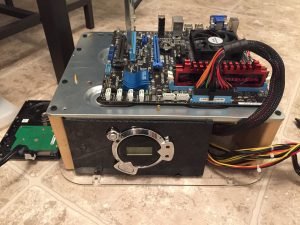
I took a part an old PC case salvaging it for parts. In this image you can see the motherboard tray I detached from the case that still has the old motherboard attached to it.
Step 2 – Used Plexiglass Glass For The PC Test Bench Bottom from Old PC Case
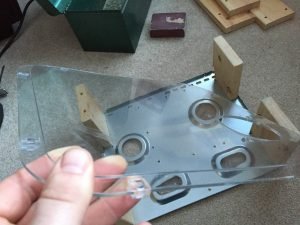
Now for this step I was going to simply cut a piece of wood the size of the motherboard tray, but then realized that the siding from the old pc case I had used a plexiglass window that was roughly the exact size of our tray. This was a very easy as all I had to do was unscrew it from the metal side door and the plexiglass was ready to use.

I detached plexiglass from the old pc cases side window to use as a bottom for the PC test bench.
Step 3 – Cutting Four Legs For The PC Test Bench’s Support
Now that I had a top and bottom for this PC Test bench, I needed to find a way of attaching them both. I had some old ikea shelving pieces in the garage that worked perfectly as these pieces simply needed to be cut to the height I wanted. In terms of figuring out exactly how high I wanted the bench, I determined simply by measuring the height of my Power Supply Unit and then adding an inch or so for breathing room – my rationale was that there would be nothing higher than this that I would need to put inside.
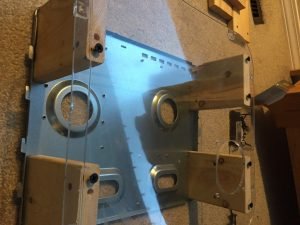
In order to attach the wood to the plexiglass and motherboard tray, I used screws with drill ends on them (no need to pre-drill) and slowly screwed the wood legs into each of the four corners through the metal motherboard tray and the plexiglass bottom. I was a little rough on the last screw going into the plexiglass and did crack it a bit, but nothing that glue couldn’t fix.

I screwed the top metal motherboard tray and the plexiglass I salvaged from the old pc case on to the four wooden corner legs.
Step 4 – Installing The PC Hardware Into The PC Test Bench
Now that the bones for my box was put together the last step of the actual DIY PC test bench was to insert all of the hardware into it to make sure of a nice fit.
Since I used a motherboard tray for the Test Bench’s top, the motherboard screwed in as nicely as it had been in the old pc build, which was nice.
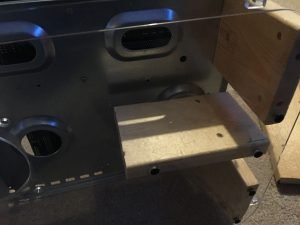
In order to secure the hardware going in the middle of the test bench, I had to cut some more wood pieces using the same wood as I had for the legs supporting the top and bottom of the test bench. I cut some wood pieces and measured how wide the Power Supply was and made a nice cubby that I was then able to slide the Power Supply into nice and tightly (screwing the wood pieces in as I went).

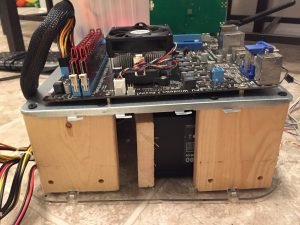
Cubby created inside the PC Test bench to support the size of the Power Supply (roughly same width as the PSU at the back of the case).
I then created a similar cubby using the same wood pieces that fit my HDD across from the Power Supply, not being too precise but leaving just enough room to squeeze in the HDD and all the power cords needed.

The insert you see on the side of the PC Test bench case here is big enough to slide a normal HDD into.
Finally, I needed a switch to turn the actual build, which is where using an old PC case came in handy. I popped off the front casing from the old PC case I had and used a Jig Saw to cut the housing for the button out measuring the height to match that of the PC Test Bench. I was then able to snuggly squeeze the button assembly into the middle of the test bench and pop the button into place. I then threaded all of the needed wires inside and plugged them in to the needed connections on the motherboard.

I had cut the switch and in casing taken from the old PC case. It was cut to the height of the PC Test Bench case and I was able to snug it in tightly between the top and bottom of the case.
Step 5 – Installing Kodi Software
Now that the PC build was put together on to the test bench, all that was left was to install the actual Kodi software.
The first step here was to first download a copy of Kodi on to my other PC and then I had to install that on to a bootable USB stick – to do this there is various software available such as Linux Live USB Creator (and many others) and there is a full tutorial of how to do this on the Kodi wiki on their HOW-TO:Install Kodibuntu from a USB drive article.
The next step is to install Kodi on your PC by booting in the BIOS and then selecting to boot up from the USB stick that has Kodi on it, then all you do is follow the installation steps.
Kodi Box and PC Build Completed Using a DIY PC Test Bench
In the end I had a tight & compact DIY PC Test Bench that was probably almost as small as I could build using an ATX sized motherboard tray and little effort. I also had put together a PC Build that now supports a copy of the Kodi Open Source Home Theatre Software that I use to stream media to my TV.
In terms of controlling the Kodi media software and the PC, I downloaded the Sybu Kodi app to my iPhone, which literally just works with little setup. So all I have to do is boot the build up, startup the app on my iPhone and viola the app works instantaneously without the need of a keyboard or mouse (which I only needed to use for the initial installation and setup of the Kodi software). *Plus the app also shuts the PC off!
The Kodi Box PC Build works perfectly and was accomplished for no extra cash on my part, and could possibly be done very cheaply even if you have to buy all of the pc hardware from scratch. If you are looking to do something similar, take a look at any old hardware you have laying around or ask your friends and family, you could find a use out of someones old PC hardware.
Building My DIY PC Test Bench And Kodi Box PC Build Gallery


-
- I had cut the switch and in casing taken from the old PC case. It was cut to the height of the PC Test Bench case and I was able to snug it in tightly between the top and bottom of the case.


-
- I detached plexiglass from the old pc cases side window to use as a bottom for the PC test bench.

-
- Cubby created inside the PC Test bench to support the size of the Power Supply (roughly same width as the PSU at the back of the case).


-
- I screwed the top metal motherboard tray and the plexiglass I salvaged from the old pc case on to the four wooden corner legs.


-
- The insert you see on the side of the PC Test bench case here is big enough to slide a normal HDD into.


Comments 4
HI Corey, very good example. I would also be interested in the software side of this project. I am planning to use some old PC hardware , but have no idea on what software to use.
Author
Say you have your PC all setup up, you’d then just install the Kodi software on to an empty hard drive. You can download it here: https://kodi.tv/download/
To actually install the software you have to make a bootable USB so that you have a way of installing it on your newly built pc, of which you can use http://www.linuxliveusb.com/en/download to create the bootable USB on another PC.
Once you have it on the USB, just plug it into your newly built pc and boot up using the USB, and install Kodi.
Hopefully this helps!
Am I missing something? Everything I’m reading indicates Kodi is an application, not an OS. Therefore, you cannot just boot into Kodi – you have to install an OS first (ie Android, Linux, Windows, etc) and then install the app. No?
Author
Ah I see, I think they got rid of the standalone version or something. What I would suggest then is install Ubuntu (free): https://www.ubuntu.com/ as your OS and then install the Linux version of Kodi from here: https://kodi.tv/download
Hope this helps